How to Choose an Asscher Cut Diamond
Proportions, clarity, color, pattern, and a practical buying checklist
Quick answer
Prioritize a length-to-width ratio of 1.00–1.05, a clear windmill or concentric-square pattern in video, and VS2+ clarity with G–H color for most buyers. Asscher cut grades on reports are weak guidance — proportions and live imaging matter more than a single cut label.
What you are actually judging face-up
The report gives dimensions and finish grades; video tells you whether those facets organize into an attractive pattern. Use the numbers to screen, then use motion to judge the stone.
Key takeaways
- Square outline: L/W 1.00–1.05 is the visual ideal
- Depth often sits in the mid-60s to low-70s; table roughly 55–65% is common
- Video is essential to judge pattern, windowing, and eye-visible inclusions
- VS2 clarity and G–H color are the practical sweet spot for value
- GIA may label these stones “Square Emerald Cut” — the look is what counts
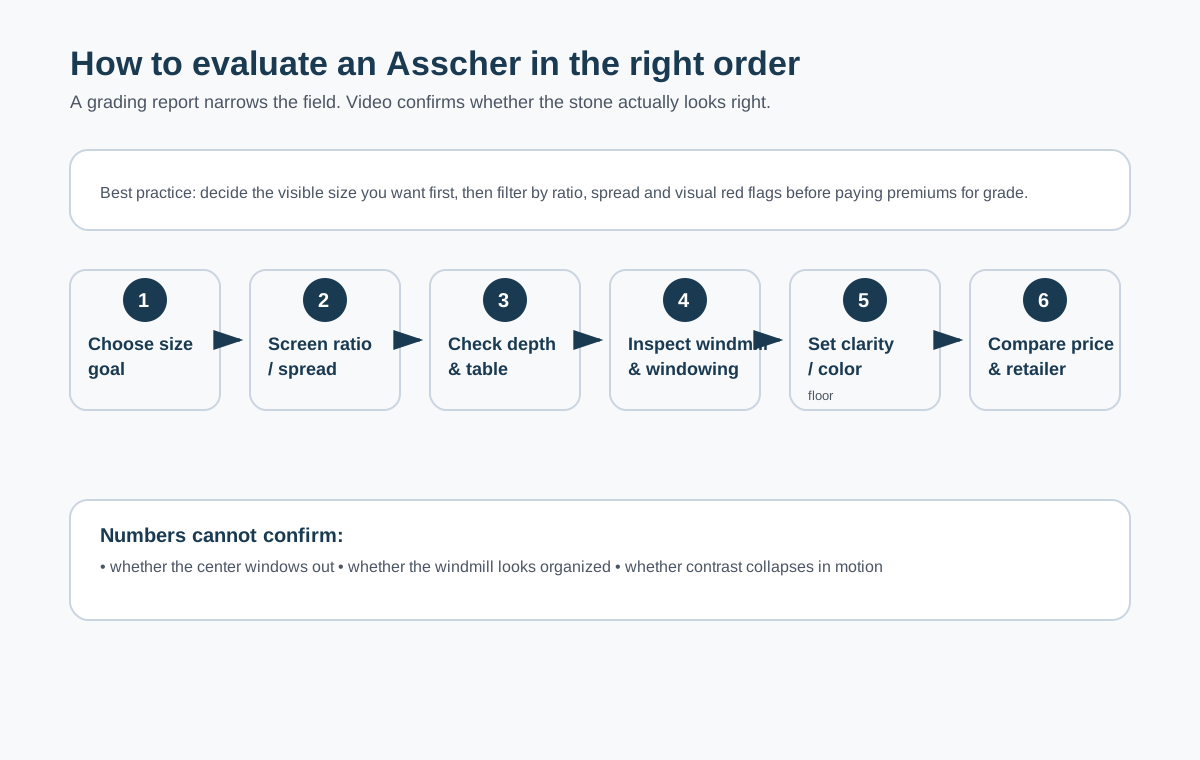
The 8-step Asscher buying sequence
| Step | Check | Reject or reconsider when… |
|---|---|---|
| 1 | Square outline / ratio | The shape looks more rectangular than you want |
| 2 | Depth, table and millimeter spread | Carat weight is hiding in depth with poor face-up size |
| 3 | Windmill and facet symmetry | The pattern looks lopsided or visually confused |
| 4 | Windowing/extinction | You see persistent transparency or broad dead zones |
| 5 | Clarity | An inclusion is obvious face-up at normal viewing size |
| 6 | Color | The warmth is stronger than you want in the chosen metal |
| 7 | Report and seller terms | You cannot verify the grading report or return conditions |
| 8 | Setting fit | The setting is not confirmed for the candidate's exact measurements |
1. Length-to-width ratio
This is the hallmark of the Asscher: it should look square.
- Ideal: 1.00 – 1.05
- Above about 1.08 the stone starts to look rectangular and may read more like a short emerald cut.
Always check the actual measurements on the grading report, not only the shape name.
2. Depth & table percentages
For a deeper treatment, use the Asscher depth guide, table percentage guide, and complete proportions guide.
Asscher cuts are naturally deeper than most other shapes. A depth that would be considered poor for a round can be excellent for an Asscher.
- Depth: Roughly 60–72% is a common working range; many strong stones sit in the mid-60s to low-70s.
- Table: Approximately 55–65% is frequently preferred. Extremely large tables can increase windowing; very small tables can darken the center.
Numbers alone are not enough — light performance (pattern and contrast) matters more. Always review 360° video when available.
3. Windmill pattern & avoiding windowing
See the dedicated windmill pattern guide and windowing & extinction guide for side-by-side diagnostic criteria.
A well-cut Asscher shows a clear concentric-square or “X” / windmill pattern through the table. Extinction occurs when light is not returned, creating dead black zones. Some contrast is desirable for the pattern; large dark or see-through (windowed) areas are not.
High-resolution 360° imaging is the best way to judge this before buying.
4. Clarity — the window effect
Use the Asscher clarity guide when comparing VS2, VS1 and VVS candidates.
The large open table acts like a clear window into the center. Inclusions that would be masked by the sparkle of a round brilliant are often easily visible in an Asscher.
- Recommended: VS2 or higher for most buyers who want a clean-looking stone.
- VS1 / VVS is ideal if budget allows.
- SI1 can work only if inclusions are carefully placed and not eye-visible — inspect thoroughly on video.
5. Color — body warmth shows more
The dedicated Asscher color guide explains D–J trade-offs by setting and size.
Step cuts reveal body color more readily than brilliant cuts. Cropped corners and open facets make warmer tones more noticeable.
- Sweet spot for value: G–H (near-colorless).
- F and above for a colder, brighter look.
- I–J can work in yellow gold or for buyers who prefer a warmer appearance, but the tint is more obvious than in a round of the same grade.
6. Labs & report names
Prefer GIA reports for natural diamonds. For lab-grown, IGI is widely used and accepted. AGS light-performance grading is excellent when available but relatively rare for Asschers.
GIA often labels classic Asscher-style stones as “Square Emerald Cut” on the report. The visual appearance (square outline + cropped corners + step faceting) is what defines the look buyers want.
7. Settings that protect the cut
Protect the cropped corners while highlighting the geometry:
- Four-prong settings that secure each corner are classic and secure.
- Bezel or partial-bezel settings offer maximum protection and a modern or Art Deco feel.
- Halo settings can increase face-up size and add vintage character.
- Avoid thin, delicate prongs that leave corners exposed.
See the full ring styles guide for more detail.
What changes the answer?
- Smaller stones: minor clarity features may be harder to see, so paying for extremely high clarity can have less visual benefit.
- Larger stones: open step facets make inclusions and body color easier to notice; visual inspection becomes even more important.
- Yellow or rose gold: some buyers are comfortable with slightly warmer color because the setting itself is warm-toned.
- Halo settings: face-up size can matter less because the halo adds visual presence.
- Minimal solitaire: the center stone is exposed visually, so pattern, spread and clarity do more of the work.
Common mistakes
- Buying on carat weight and report grades alone without reviewing video of the pattern
- Accepting a rectangular outline (L/W much above 1.05) when a square look was intended
- Under-specifying clarity because “SI looks fine on rounds”
- Ignoring face-up size: deeper Asschers can look smaller than shallower shapes of the same carat
- Skipping return policies — always keep the option to evaluate in person
Expert buying checklist
- Confirm length-to-width is 1.00–1.05 (or very close).
- Review high-resolution or 360° video for pattern, windowing, and eye-visible inclusions.
- Choose VS2+ clarity unless you have verified an SI stone is clean to the eye.
- Target G–H color for the best balance of appearance and price (adjust for metal preference).
- Prefer GIA for natural; check current lab-grown inventory side by side if considering that route.
- Compare the same approximate specs across two or three retailers.
- Use a retailer with a strong return window.
Move from education to a shortlist
If you have actual report data, use the tools before opening retailer inventory. This keeps the shopping sequence evidence-first.
Next steps
Buying Asscher hub Price Guide Best Places to Buy
Check an actual candidate
Have a grading report in front of you? Run the numbers through the Asscher Proportion Checker and then compare finalists side-by-side with the Candidate Comparison Tool.
Compare Asscher inventory at our recommended partners (affiliate links).
Sources & further reading
- GIA educational materials on step cuts and square emerald / Asscher-style diamonds
- Retailer imaging tools (e.g. 360° viewers) for practical evaluation of pattern and windowing
- Related guides on this site: What is an Asscher, Asscher vs Emerald, Price Guide
Educational only. Always verify current inventory, reports, and policies with the seller.
How to judge Asscher quality
Use the report to screen, then use pattern and video to choose.
Certification & GIA
Read the grading report without expecting an Asscher cut grade.
Certification guide →Asscher size & dimensions
Carat is weight. Use millimeters and spread to understand what you will actually see.